Create Custom Miniatures for Cooperative Dungeon Crawler Campaigns

Miniatures do more than mark where a character stands on the board. In a good cooperative dungeon crawler, they help players recognize heroes instantly, give monsters more personality, and make a campaign feel like it belongs to the group playing it.
The problem is that the exact character you imagine is not always available in the box.
Maybe your campaign has a heavily armored dwarf healer, a ranger with an unusual weapon, or a recurring monster that deserves something more memorable than a generic token. Custom miniatures can solve that, but traditional sculpting requires time and 3D modeling experience.
AI-assisted 3D tools create another route: describe the character, generate a model, inspect it, and prepare it for printing.
Start With the Role the Miniature Plays at the Table
Before generating anything, decide what the miniature needs to communicate during play.
A display model can focus heavily on fine detail. A gaming miniature has different priorities.
Players need to recognize it quickly from across the table.
That usually means focusing on:
- a strong silhouette;
- one or two distinctive weapons;
- readable armor or clothing;
- a pose that matches the character;
- details large enough to survive printing and painting.
For example, if a hero is known for carrying a large crossbow, that weapon may be more important than adding several small belt accessories.
A miniature designed for tabletop play should remain readable at tabletop distance.
Build the Character Around a Clear Description
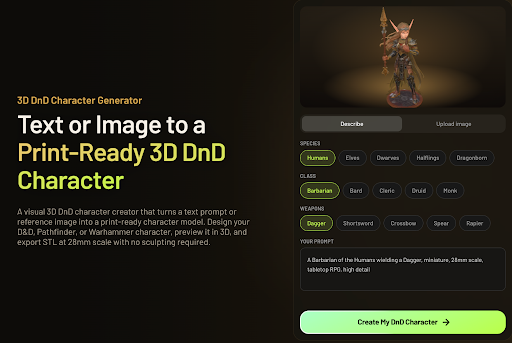
A useful character prompt should describe the things that actually affect the model.
Instead of writing: fantasy warrior
try something more specific: dwarf cleric wearing heavy plate armor, carrying a war hammer and round shield, short braided beard, defensive stance, tabletop miniature
That gives the generation process more information about:
- species;
- class or role;
- equipment;
- clothing;
- pose;
- overall style.
A browser-based tool such as Meshy lets users begin with a text description or reference image and preview the resulting character in 3D before moving further into the workflow.
Its DnD character tool is designed around tabletop-style characters and includes a browser preview, so users can rotate the model and inspect it from several directions rather than judging it from a single image.
A Reference Image Can Be Better Than More Prompt Words
Some characters are difficult to describe accurately.
Maybe you already drew the hero during character creation, commissioned a portrait, or generated a concept image for the campaign.
In that case, using the image as a visual reference may communicate more than adding another paragraph to the prompt.
A reference can help clarify:
- proportions;
- outfit;
- hairstyle;
- armor shape;
- major accessories;
- color direction.
This becomes especially useful when the group has been playing the same character for months and already has a clear idea of how that hero should look.
The goal is consistency between the character imagined during play and the object that eventually appears on the table.
Inspect the Miniature as a Physical Object
A character that looks impressive on screen may still be difficult to print.
Rotate the model and look closely at areas that could become fragile.
Typical problem areas include:
- thin swords;
- staffs;
- arrows;
- horns;
- fingers;
- capes separated from the body;
- narrow ankles;
- floating accessories.
At miniature scale, very thin details can become weak or disappear entirely.
A slightly thicker weapon may look less delicate in the digital preview but survive handling much better after printing.
Pose Matters More Than Many Players Expect
A dramatic pose can make a miniature memorable, but extreme poses may also make it harder to print, transport, or use on a crowded board.
For regular gameplay, consider whether the pose:
- fits comfortably on the intended base;
- makes the character easy to identify;
- creates fragile unsupported areas;
- takes up too much neighboring space;
- makes painting unnecessarily difficult.
A wide sword swing may look fantastic as a display piece and become annoying when several heroes occupy adjacent spaces.
Tabletop miniatures need to work as playing pieces as well as visual objects.
Think About the Character at 28mm Scale
Meshy’s DnD character workflow is built around the common 28mm heroic miniature scale and can export models for later printing.
Scale matters because detail behaves very differently on a computer screen and on a small physical model.
A belt buckle can appear enormous while zoomed into a 3D viewer and become almost invisible after printing.
When evaluating the model, ask:
- Will the face still read at miniature size?
- Are the weapons thick enough?
- Are important accessories recognizable?
- Are gaps between limbs large enough to remain open?
- Will the base remain stable?
For tabletop use, exaggerating important features slightly can sometimes create a more readable miniature.
Create Heroes Before Building an Entire Monster Collection
It is tempting to generate every monster, NPC, and piece of terrain for a campaign immediately.
That can turn a fun customization project into a huge production task.
A better approach is to begin with the miniatures that players interact with most.
Player Characters
These appear in every session and usually deserve the most customization.
Recurring NPCs
A recurring ally, rival, or villain can become much more memorable when represented by a unique figure.
Signature Monsters
If one creature anchors an important scenario or boss fight, a custom model can make that encounter feel special.
Generic enemies can continue using the miniatures already included with the game.
Custom work has the most impact when it highlights something important.
Printing Still Requires a Preparation Step
Generating the model is only part of the process.
Before printing, the file should still be checked in the slicer.
Review:
- final scale;
- orientation;
- supports;
- first-layer contact;
- fragile areas.
Resin printing is often popular for detailed miniatures because it can capture small surface features, while FDM may work better for larger figures or terrain depending on the printer and settings.
Whichever method is used, inspect the sliced layers before starting the job.
A model that looks fine in 3D can reveal awkward unsupported sections once supports and layer paths become visible.
Leave Room for Painting
A miniature covered with extremely dense surface detail can be surprisingly difficult to paint.
Think about where a brush needs to reach.
Deep recesses between the arms and torso, tightly packed equipment, or overlapping cloth can create areas that are difficult to access.
For gaming pieces, slightly clearer shapes can often produce a better finished result than maximum surface complexity.
Distinct armor panels, clothing layers, weapons, and accessories also make it easier to create a readable color scheme.
Custom Minis Can Support Homebrew Campaigns
The most interesting use case may be content that does not exist commercially.
Cooperative groups often create:
- custom heroes;
- homebrew scenarios;
- fan-made campaigns;
- original monsters;
- alternate versions of existing classes.
A custom miniature lets those ideas gain a physical presence on the table.
A campaign centered on a swamp settlement might need a moss-covered guardian. A sci-fi dungeon crawler could use a damaged maintenance robot as a recurring ally. A fantasy campaign might introduce a villain whose equipment changes after every major encounter.
These figures do not need to come from an existing miniature catalog.
They can be designed around the campaign itself.
Keep Intellectual Property in Mind
Customization for a private gaming table is different from selling models commercially.
If a design closely reproduces a copyrighted character, logo, or protected franchise element, commercial use can raise intellectual-property issues.
For original campaigns, the simplest route is to create original characters and monsters rather than reproducing an existing miniature exactly.
Plan terms matter too. On Meshy’s Free plan you can generate and preview a miniature, but downloading the STL for printing requires a paid plan, and paid-plan users own their generated models, which matters if the group later wants to sell prints.
That also makes the project more personal.
A Simple Custom-Miniature Workflow
For most hobby groups, the process can remain straightforward:
Step 1: Define the character
Write down species, class, equipment, pose, and one or two defining features.
Step 2: Generate or use a reference image
Choose whichever communicates the idea more clearly.
Step 3: Inspect the model in 3D
Look for fragile parts, odd geometry, and an unclear silhouette.
Step 4: Prepare it at tabletop scale
Confirm that weapons, limbs, accessories, and base size still work when reduced.
Step 5: Export and slice
Check orientation, supports, and first-layer contact.
Step 6: Print and paint
Use the miniature in play and note anything you would change for the next character.
After creating one successful hero, the same workflow can be reused for NPCs, villains, and signature monsters.
Custom Miniatures Work Best When They Support the Story
The best miniature is not always the one with the most detail.
For cooperative campaigns, a miniature succeeds when players immediately know who it represents and associate it with moments from the game.
A distinctive weapon, familiar pose, or recognizable silhouette can do more for that connection than dozens of tiny decorative details.
AI-assisted 3D generation makes experimentation easier, but the creative decisions still belong to the players.
That is what makes custom miniatures interesting: they allow the physical game on the table to become a little closer to the campaign the group has imagined together.
